Lift AMQP with RabbitMQ and Scala – Tutorial and Screencast
Admitidally, every time i’ve ever looked at the Lift codebase in TextMate, i’ve always wondered what the hell the “lift-amqp” module was for. Well, curiosity may have killed the cat but it was not enough of deterrent to me finding out and building a sample AMQP / RabbitMQ application!
AMQP you say?
Yup, thats right. AMQP - Advanced Message Queuing Protocol to the lay’ man not familiar with the acronym. Essentially AMQP is an open standard for enterprise messaging. There are several implementations of the standard, namely, Open AMQ and RabbitMQ - the latter is newer and generally considered to be the defacto implementation. Rabbit MQ is written in ERLang and has clients for Java, .NET, Ruby etc etc.
So where does Lift fit in?
Strictly speaking, it doesn’t. It just so happens that Steve J was working on the Lift team some time ago and wrote a nifty Scala wrapper around the standard (and highly mutable) Java client implementation of Rabbit MQ. To all intense purpose, “lift-amqp” can be used in any Scala application and has no other dependencies within the Lift framework.
Hand-wavy overview
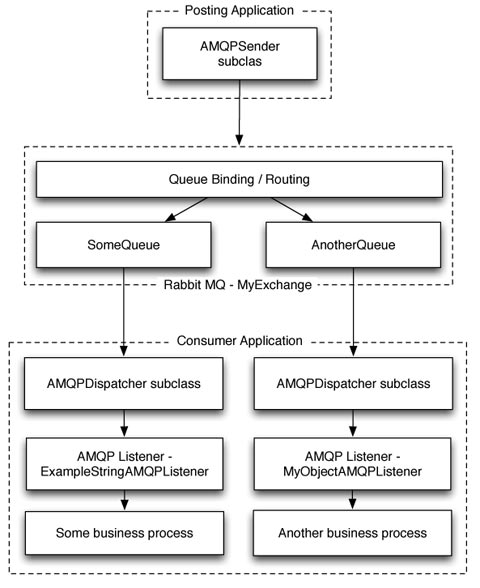
Lets get down to business… I spent quite a lot of time just looking at the source code and scala-docs for lift-amqp and for the longest while couldn’t figure out what went where. Being a fairly visual person, I’ve drawn up a diagram that explains the implementation and how you (yes, you reading this) would implement your application:
A working example?
So rather than try to post lots of pictures - I thought just putting up a screen-cast explaining the components would make more sense :-)
The client listener
So from the diagram above that explains the code layout - you can see that one of the first things you need to do is subclass AMQPDispatcher. The below is my example code that connects to the RabbitMQ broker and firstly declares a queue with the appropriate parameters. If you wondering why when the 2nd client connected in my example things didn’t explode and complain about more than one exchange existing with the same name, thats because RabbitMQ is clever enough to know that if the queue / exchange already exists then it just Noop’s the requests. Its a nice feature.
class DemonstrationSerializedAMQPDispatcher[T](
  queueName: String, factory: ConnectionFactory,
  host: String, port: Int) extends AMQPDispatcher[T](
    factory, host, port) {
  override def configure(channel: Channel) {
    val ticket = channel.accessRequest("/data")
    channel.exchangeDeclare(ticket, "mult", "fanout")
    channel.queueDeclare(ticket, queueName)
    channel.queueBind(ticket, queueName, "mult", "example.*")
    channel.basicConsume(ticket, queueName, false,
      new SerializedConsumer(channel, this))
  }
}
So, your probably thinking that this was not the class that I created an instance of during the screencast - and you’d be right. Essentially we still need a wrapper class to mask our dispatcher; the listener proper.
The purpose of the listener is to establish a connection to the broker, pass the right credentials etc. Within the listener we create an instance of the dispatcher and start its actor. We also then just have an inner class that we use for example purposes (another actor) that prints out the messages you saw in the terminal window. In reality, this would likely be passing messages to some other, external actor which handled the business process. For a full code listing see the end of this article.
The postman…
So now that you know how the example listens for messages, lets see the posting code…
val params = new ConnectionParameters
params.setUsername("guest")
params.setPassword("guest")
params.setVirtualHost("/")
params.setRequestedHeartbeat(0)
val factory = new ConnectionFactory(params)
// Create a new instance of the string sender.
// This sender will send messages to the "mult" exchange with a
// routing key of "routeroute"
val amqp = new StringAMQPSender(
  factory, "macbookpro", 5672, "mult", "example.demo"
)
amqp.start

/**
 * Salute the rabbit!
 */
def salute = amqp ! AMQPMessage("hey there!")
}
Little explanation needed here - essentially the string sender is just an actor that knows how to respond to AMQPMessage…. it couldn’t be simpler! I hope this has proved helpful and a good overview of the lift-amqp module.
If you would like to download the source code, you can get it from here